> For the complete documentation index, see [llms.txt](https://docs.datafy.io/llms.txt). Markdown versions of documentation pages are available by appending `.md` to page URLs; this page is available as [Markdown](https://docs.datafy.io/set-up-and-installation/datafy-installation/permissions-configuration.md).
# Permissions Configuration
Datafy requires basic AWS permissions to view the EC2 instances your volumes are attached to, and to control the creation and modification of EBS volumes.
You grant these permissions by creating a dedicated IAM role and providing its ARN to Datafy.
{% hint style="info" %}
Permissions are configured per AWS account. If you wish to install Datafy on multiple AWS accounts, the following steps need to be performed for each account.
{% endhint %}
## Configure IAM Role
{% stepper %}
{% step %}
#### Create IAM Role
We provide CloudFormation and Terraform templates for creating an IAM role. The template creates an IAM OIDC[^1] identity provider and an IAM role. The identity provider is used to authenticate that only Datafy uses the created role.
When creating the role, define the permissions level of the role according to the Datafy product you intend to install:
* **Sensor** **permissions** - the role provides read-only permissions. It lets Datafy retrieve data about EC2 instances and the volumes attached to them.
* **AutoScaler** **permissions** - the role includes all of the Sensor read-only permissions, and adds modification and creation permissions. The role allows creation, modification and deletion of EBS volumes, which are used to manage your EBS storage devices.
You can also optionally scope the role to a specific Datafy [account or organization](/set-up-and-installation/account-management.md). This is recommended - when scoped, only the matching Datafy account or organization can assume the role.
* Use your **Organization ID** to allow any sub-account under that organization to use the role.
* Use a specific **Account ID** to restrict the role to a single sub-account.
* Leave the value empty to trust any Datafy subject.
Both IDs are shown on the [**Permissions** page](https://app.datafy.io/settings) in the Datafy app. See [#define-role-arn-in-datafy-account](#define-role-arn-in-datafy-account "mention") below.
{% tabs fullWidth="false" %}
{% tab title="CloudFormation template" %}
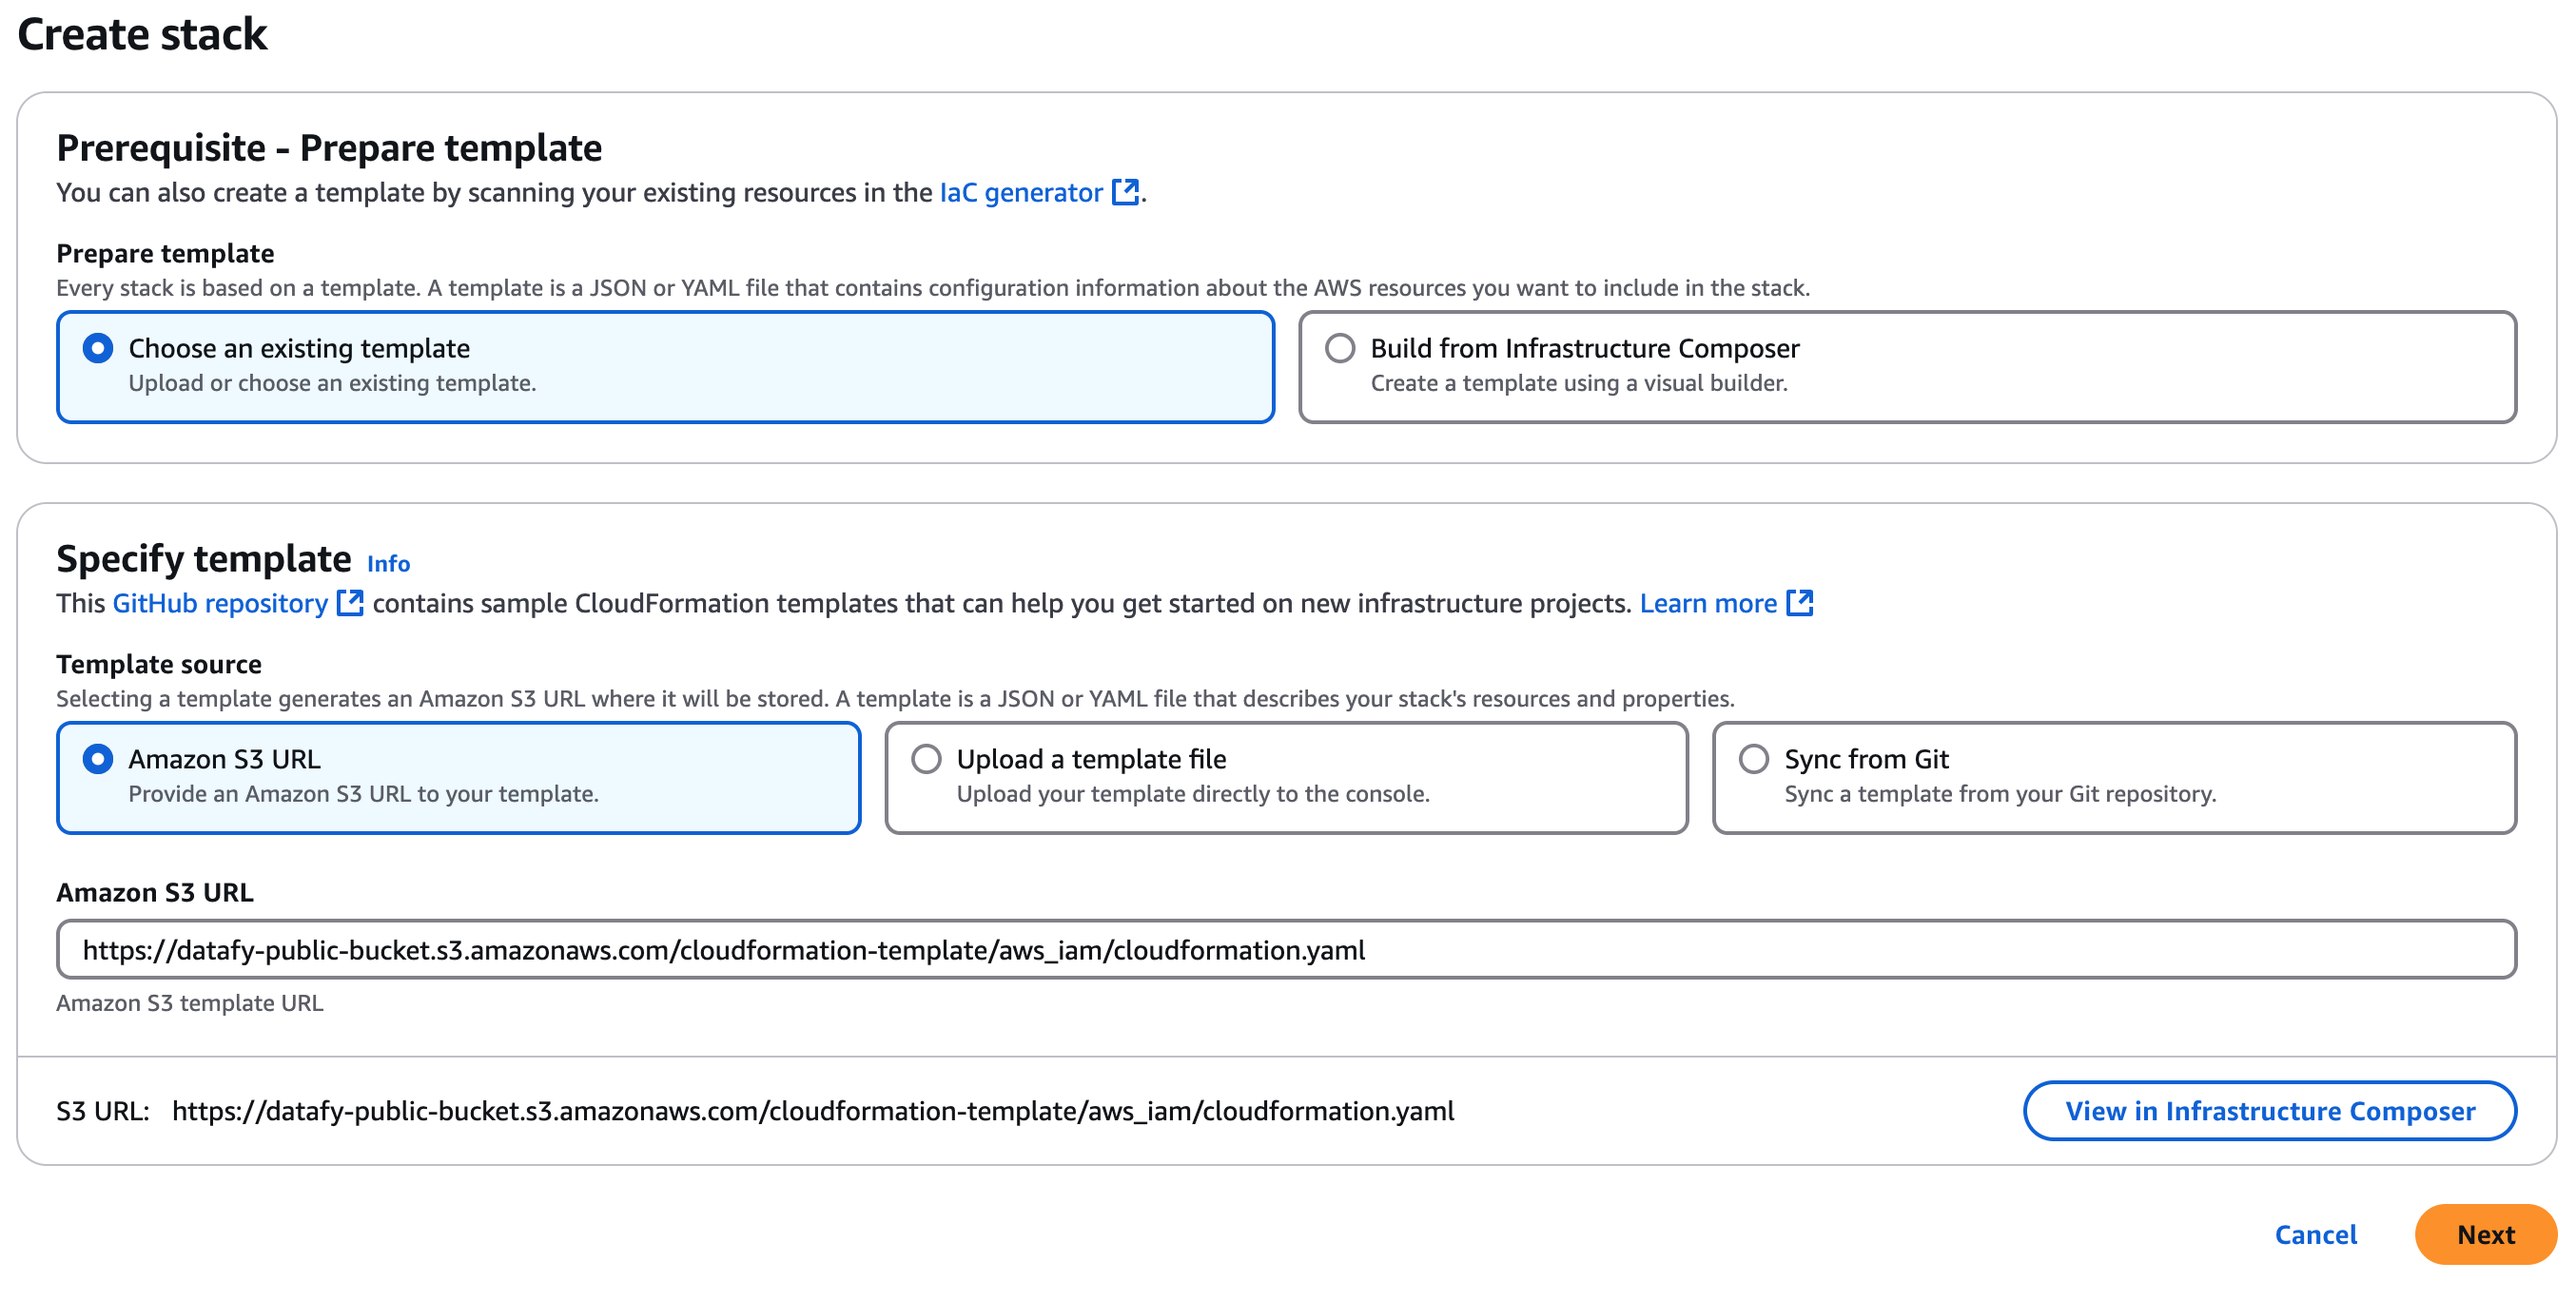
Create a new CloudFormation stack using the URL below as the template source (see screenshot).
{% code title="S3 URL" overflow="wrap" %}
```url
https://datafy-public-bucket.s3.amazonaws.com/cloudformation-template/aws_iam/cloudformation.yaml
```
{% endcode %}
In the Parameters section, choose the desired permissions level from the **Role Permissions Level** dropdown.
To scope the role, paste the Organization ID or Account ID into the **Datafy Account ID** field under **Identity Configuration**.
{% endtab %}
{% tab title="Terraform module" %}
{% hint style="info" %}
The `iam-role` module has moved. It is now a submodule of the [datafy-io/modules/aws](https://registry.terraform.io/modules/datafy-io/modules/aws/latest) collection. The standalone `datafy-io/iam-role/datafy` module is deprecated and will receive no further updates.
The inputs are unchanged. To migrate, point `source` at the new location:
```hcl
module "datafy_role" {
source = "datafy-io/modules/aws//modules/iam-role"
version = "~> 1.0"
}
```
{% endhint %}
Create the role using the [iam-role Terraform module](https://registry.terraform.io/modules/datafy-io/modules/aws/latest/submodules/iam-role?tab=inputs). The main inputs are:
* `permissions_level` — `Sensor` or `AutoScaler`.
* `permissions_scope` — `Global`, or `Regional` (with a `regions` list).
* `account_id` — Datafy Organization ID or Account ID to scope the role. Leave empty to trust any Datafy subject.
If you manage your Datafy accounts with the [Datafy Terraform provider](https://registry.terraform.io/providers/datafy-io/datafy/latest/docs), you can read the ID from the [`datafy_account`](https://registry.terraform.io/providers/datafy-io/datafy/latest/docs/resources/account) resource or data source, using `.id` for a sub-account or `.parent_account_id` for the organization, and pass it to `account_id`.
See the [module documentation](https://registry.terraform.io/modules/datafy-io/modules/aws/latest/submodules/iam-role?tab=inputs) for the full list of inputs and examples.
{% endtab %}
{% endtabs %}
{% endstep %}
{% step %}
#### Define Role ARN in Datafy Account
* In the Datafy app, go to the **Permissions** section of the [account settings](https://app.datafy.io/settings). An Admin role is required to access the settings panel.
* Fill in the ARN of the IAM role you just created.
* The IAM role associated with the ARN will be validated. If the ARN is incorrect, or the permissions in the associated role are incorrect, you will receive an error.
The Permissions page also displays the **Organization ID** at the top and the **Account ID** under each sub-account. Copy either to use as the `Datafy Account ID` parameter when creating the role.
{% hint style="info" %}
If the role cannot be validated, for example because your AWS account has an attached organizational [SCP](https://docs.aws.amazon.com/organizations/latest/userguide/orgs_manage_policies_scps.html), you can skip the validation and insert the role anyway. Make sure your role has all of the necessary permissions for Datafy to work as expected.
{% endhint %}
{% hint style="info" %}
The role ARN can also be registered programmatically using the [`datafy_role_arn`](https://registry.terraform.io/providers/datafy-io/datafy/latest/docs/resources/role_arn) resource from the Datafy Terraform provider.
{% endhint %}
{% endstep %}
{% endstepper %}
{% hint style="info" %}
If you're using custom encryption keys, ensure that the Datafy role isn't restricted by your KMS policy. Datafy needs to be able to create volumes that "inherit" the keys of the original source volume that is being auto-scaled
{% endhint %}
## Validate Configuration
After you've created and defined the IAM role, you can see all of the volumes in your account in the [Datafy app](https://app.datafy.io/fleet-manager).
At this stage, you can view the AWS attributes of each volume, including its provisioned size, but not the actual utilization. To view the utilization of each volume, continue with the installation process.
[^1]: OpenID Connect
---
# Agent Instructions
This documentation is published with GitBook. GitBook is the documentation platform designed so that both humans and AI agents can read, navigate, and reason over technical content effectively. Learn more at gitbook.com.
## Querying This Documentation
If you need additional information that is not directly available in this page, you can query the documentation dynamically by asking a question.
Perform an HTTP GET request on the current page URL with the `ask` query parameter, and the optional `goal` query parameter:
```
GET https://docs.datafy.io/set-up-and-installation/datafy-installation/permissions-configuration.md?ask=&goal=
```
`ask` is the immediate question: it should be specific, self-contained, and written in natural language.
`goal` is optional and describes the broader end goal you are ultimately trying to accomplish on behalf of the user. GitBook uses it to tailor the answer towards what is most useful for that goal.
The response will contain a direct answer to the question and relevant excerpts and sources from the documentation.
Use this mechanism when the answer is not explicitly present in the current page, you need clarification or additional context, or you want to retrieve related documentation sections.
.png?alt=media)
.png?alt=media)
